Sep 17, 2011

Compound lead screw arrived

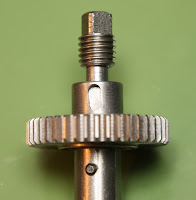
Yes, it had arrived, and was not unbearably expensive: EUR 5.30 + VAT. It seems to be much better than the original one, the threading is nicer, and of correct size. The outer diameter is 7.90 mm along the whole screw.


After inserting it to it's place, the compound nut can now be backlash compensated. With the original lead screw it had 0.4 mm backlash in worst case.

Mentioned elsewhere many times that the scaling of the dials are confusing on this machine. On every dial the whole circle has 50 divisions, as if the screws would have 0.5 mm lead, but they have 1 mm lead in fact, so a whole turn causes 1 mm shift, while the dial counts 50.


Well, it's indicated that one division means 0.02, but who likes multiplying all the time. In case of the cross slide it is even more interesting to multiply by 4 if you count in diameter...

I use the machine since 3 months by now, machined different pieces of different materials, inner and outer threads etc. What I disliked so far:

1. The compound gib had to be readjusted from time to time, what is embarrassing.
My first observation was that the adjusting screws had peaky tapered end, so they can intrude deeper and deeper to the gib due to mechanical wear, increasing the backlash of the compound from time to time. I modified the screws to have a hemisphere like ending rather than tapered. This resulted a better behaviour, but let's give it some time. Otherwise if the compound is positioned so that only one single screw is "active" at the middle of the cutter rest (picture on the left), the compound has a slight backlash, while if two screws are "working" (picture on the right), it is just good.


The next idea is to put an additional screw between each existing one. I plan to do it, and will write my experiences in an upcoming  post.


2. I found the toolpost clamping lever too small, so changed to a bigger self-made one. Later I checked on the exploded view that the rod-shaped lever knob is a separate piece fixed with M6 thread to the clamp, so it would have been enough to change that to a longer one.


Jul 29, 2011

Can lefthanded threads be made on the SIEG C4?

My answer is yes.
The reasons to deal with this question here are:
1. Not explicitly mentioned in the manual.
2. I have read in reviews that the spindle and leadscrew relative rotation directions would be fixed.

Although there is no lever to change, but with proper placement of the change gears the leadscrew rotation can be changed relative to the main spindle.

Normal arrangement
Reverse arrangement for left threads

Jul 4, 2011

SIEG C4 lathe in the house

I have recently purchased a SIEG C4 lathe. Of course before deciding which to buy, I read all available articles on the internet about similar machines. Among them a great review of the SIEG C4 lathe here.

The machine came from ARTEC company, a distributor of SIEG in Germany, however I bought it in Austria from a private person. The machine was in the original box and was covered by the red conservation grease. There was neither a factory test report nor any other paper indicating at least the date of production, but a small label on the outer surface of the wooden box with 2008.07.08. written on it. I assume this could be the date of production. So the 3 year old baby can come out of the box at last.


It is a heavy piece, so I dismounted a few easily removable parts before carrying the machine down on the stairway to my basement. Three persons and ropes helped that big amount of cast iron to take it's new place.

First of all let's see whether it was worth carrying or not: before beginning to remove the red stuff, I checked the runout of the main spindle taper and the chuck flange.

Both values were well under 0.01 mm
Main spindle taper runout appeared to be around 0.003 while the flange around 0.005 mm. Not bad at all for the price.

The machine must be disassembled, properly cleaned and lubricated before the first use. Do not use it as it comes out of the box, mine was full of metal chips, some parts were not properly assembled etc..
Let me recommend about cleaning the machine, this was very useful, thank you Jaakko!

I do not want to repeat what Jaakko wrote, let me mention just a few things recognized during the cleaning of my machine.

When cleaning the change gear train I found that one gear was sitting so firm on the axle, that I could hardly remove it. The reason can be seen on the picture on the right: the groove is not parallel with the shaft.

I had to grind the outer part of the key in such a way that it appears to be parallel despite the incorrect groove.
Seems, that newer machines have rectangular bracing in the bed, while older ones had diagonal. Mine has diagonal.
 I just assume they changed it for some reason, see Jaakko's blog, his machine is newer, has rectangular bracing and has 00425 stamped as serial number in the bed. The serial number on mine is 80083. Maybe the numbering begins from 00001 on the newer beds with rectangular bracing? Who knows...

The real surprise came when I opened the apron's bottom cover. There were iron chips on it, and almost everywhere in the apron. I wonder if all the machines come out from the factory in such a state, or mine was the only exception... 

Chips on the apron's bottom...
... and in the apron itself


So I dismounted the apron from the saddle and began cleaning.


The compound lead screw is the next item worth mentioning. The threading is unacceptably inaccurate, the outer thread diameter is 7.65 mm instead of 8, and even smaller at the other end, 7.55 mm. I try to order a new one from my local SIEG distributor, hope it will be better.

Most of the above mentioned and eventual other similar problems can be corrected during cleaning and reassembling the machine. The fact that the materials what the machine is built of are not always of the proper quality, can not be changed so easily. The surfaces of gibs, shafts, gear teeth etc. are also not always as fine as should be.

In spite of all these problems I like this machine very much, for this price and by the probable light usage in my workshop it will hopefully last for long years.